Last Updated on March 6, 2025 by Practical Astrophotography Staff
Let’s dive into photographing the lunar eclipse happening on March 14, 2025. This is a total lunar eclipse, and with the right approach, you can capture some stunning images. I’ll break it down into the topics you requested: timing and location, planning, bracketing, composition, and post-processing.
What Time and and where can the Lunar Eclipse be seen?
The total lunar eclipse on March 13–14, 2025, will be a treat for skywatchers, especially in North and South America, where it’s fully visible from start to finish. The event kicks off late on March 13 and runs into the early hours of March 14, with timings varying by time zone. Here’s the breakdown in Eastern Daylight Time (EDT), assuming daylight saving time is in effect by mid-March (it typically starts the second Sunday of March in the U.S.):
- Penumbral phase begins: 11:57 PM EDT on March 13 (03:57 UTC on March 14
- Partial eclipse begins: 1:09 AM EDT (05:09 UTC)
- Totality starts: 2:26 AM EDT (06:26 UTC)
- Peak of totality: 2:58 AM EDT (06:58 UTC)
- Totality ends: 3:31 AM EDT (07:31 UTC)
- Partial eclipse ends: 4:47 AM EDT (08:47 UTC)
- Penumbral phase ends: 6:00 AM EDT (10:00 UTC)
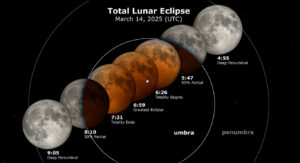
The whole event lasts about six hours, with totality—the most dramatic part, when the Moon turns a reddish hue—lasting 65 minutes. Visibility-wise, this eclipse favors the Western Hemisphere. If you’re in the U.S., Canada, or South America, you’re in luck—it’s visible everywhere the Moon is above the horizon. Western Europe gets a partial view before moonset, while parts of Asia, Australia, and Africa catch portions depending on their local timing. Check a site like timeanddate.com with your exact location for precise local times, as the Moon’s position in your sky will depend on where you are.
Planning
Good astrophotography starts with solid prep. First, confirm the eclipse timing for your specific location—apps like PhotoPills or Stellarium can pinpoint when and where the Moon will be in your sky. For example, in the eastern U.S., the Moon will be lower in the western sky by totality, while in the west, it’ll still be higher up. Next, scout your spot. You want a clear view of the Moon, ideally away from city lights to cut down on light pollution. If you’re near mountains or buildings, make sure they won’t block the Moon’s path—PhotoPills can help simulate this.
Gear-wise, you’ll need a camera with manual settings (DSLR or mirrorless works best), a sturdy tripod, and a lens. A telephoto lens (200mm or longer) is ideal for close-ups of the Moon, but a wide-angle lens (24–50mm) can capture it with a landscape. Bring extra batteries and memory cards—it’s a long night, and cold weather (if you’re in a northern spot in March) can drain batteries fast. Check the weather forecast obsessively; clouds can spoil everything, though thin ones might add drama. Finally, test your setup beforehand—focus on the Moon a night or two prior to get the hang of it.
Bracketing
Exposure is tricky during a lunar eclipse because the Moon’s brightness changes dramatically. During the partial phases, the uneclipsed part is bright, while the shadowed part is dim—up to 8 stops apart. Totality dims the Moon significantly, often turning it red. Bracketing—taking multiple shots at different exposures—is your friend here. Try a three-shot bracket with one-stop intervals: one at your meter’s suggested exposure, one underexposed, and one overexposed. For partial phases, expose for the bright highlights (e.g., ISO 200, f/8, 1/250 sec with a 300mm lens). During totality, shift to the shadows (e.g., ISO 800, f/5.6, 1–2 sec), adjusting based on how dark it gets.
Why bracket? You can’t predict the Moon’s exact brightness—atmospheric conditions like dust or haze can shift it. Plus, you’ll have options to pick the best shot later or blend them if needed. Most modern cameras have an auto-bracketing feature (AEB); set it and fire away every few minutes to capture the eclipse’s progression.
Composition
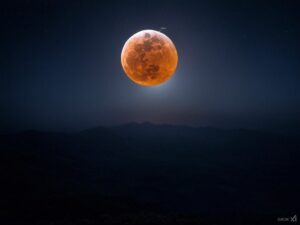
Composition depends on your vision. For a tight shot of the Moon, use a long lens (300mm+) to fill the frame with lunar details—craters pop during partial phases, and the red glow of totality is striking. Center the Moon or use the rule of thirds for balance. If you want context, switch to a wide-angle lens and include foreground elements like trees, mountains, or a skyline. Plan this with an app to align the Moon with your subject—say, having it rise over a ridge at totality.
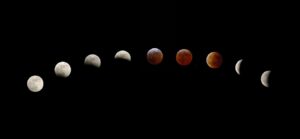
The Moon moves about 15 degrees per hour, so for wide shots, position it on the left (northern hemisphere) or right (southern hemisphere) to let it drift across the frame over time. During totality, stars pop out as the Moon dims, so a wider shot can capture constellations like Leo (where the Moon will be). Experiment with single shots or a sequence you’ll composite later to show the eclipse’s stages in one image.
Post-Processing
Raw files are your best bet—they retain more data for tweaking. In software like Lightroom or Photoshop, start with exposure and contrast. For partial phases, boost shadows to reveal the eclipsed area, but don’t overdo it—blending bright and dark parts can look fake. During totality, increase clarity and vibrance to enhance the red tones, and tweak white balance if it’s too warm or cool (manual white balance in-camera helps here too).
Noise can creep in with high ISOs during totality, so apply noise reduction sparingly. If you shot a sequence, stack them in Photoshop: align the Moon (use “Auto-Align Layers”) and blend with “Lighten” mode for a progression effect, or mask layers for a composite with a static foreground. Crop for impact, and sharpen lightly to bring out lunar texture. Keep it natural—overprocessing can turn a cosmic wonder into a cartoon.
Wrapping Up
Photographing this eclipse is about patience and experimentation. You’ve got hours to play with, so start shooting at the penumbral phase and adjust as the light shifts. Whether you’re zooming in on the blood-red Moon or framing it against a starry landscape, the key is preparation and flexibility. Get out there, enjoy the show, and let your camera capture the magic!